Thursday - April 23, 2009
Tuning The Ruger SP101, Chapter 1
In which our storyteller does a scary thing. Two scary things. Several times, even.
When I brought my little Son of Gun home the other day, it was pretty stiff. Fresh from the box the action was kind of rough. No jerky spots in the trigger pull, but you could both feel and hear the internal bits rubbing on each other. This is not at all uncommon for Rugers. They tend to be a little less polished inside than they could be, but most of that goes away with a bit of use.
For the past couple of days it’s been Click Central here. The little gun sits by the couch, unloaded of course, and my wife and I take turns “shooting” at the TV set. Not only is it good exercise - my trigger finger is tired, I’m beginning to get my shooter’s callous back again, and my forearm muscles are getting ripped - it’s also very good safety practice. Every time either of us picks up the pistol we open the cylinder and check that it’s unloaded. Of course we know it is, but we’re trying to force a habit to become automatic. And then it’s back to click click click. Hey, I can pull that trigger 110 times in about 50 seconds before my hand gives out.
Dry firing is never going to harm this pistol. Besides the fact that it is a Ruger, and thus built like a tank ought to be built, it has a transfer bar between the hammer and the firing pin, so no excessive wear is going on. My guess is that that trigger has been pulled about 2000 times by now. And the action has smoothed out tremendously. So it’s time to start the tune up in earnest.
Sorry, no pictures of this process. I’ll try to remember to take pics when putting things back together.
Step 1 - Disassemble and Clean
part a) Read the manual. Read the manual. Read the manual, read the parts list, learn to identify all the bits. There is one of those very useful exploded diagrams in the back. Learn it.
part b) Find a clean area to work in. Turn on all the lights. Get hold of a paper clip and the proper size screwdriver. Now take the gun apart.
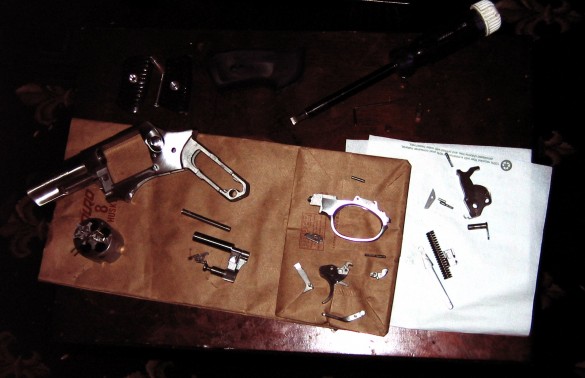
part c) Really take the gun apart. Down to the last screw, pin, and spring. It comes apart easily. First you take off the grip by removing the screw, then the grip panels, then knocking out the little aluminum dowel in the bottom of the grip. Slide the grip off. Cock the hammer. Put an end of the paper clip through the hole in the mainspring bar. Pull the trigger and let the hammer fall forward. The mainspring is now compressed against it’s slider by the paper clip, and it just falls out as a unit. Snick the left side of the hammer retaining pin with your finger and that pin falls out. Turn the gun over and the hammer falls out. Set all these bits aside.
part d) The trigger mechanism is a module that snaps to the underside of the frame. Take a narrow screwdriver and by going in through the little hole in the back of the mainspring housing, push it’s retaining peg in. It’s a strong spring so this takes a good firm push. When you’ve got that compressed, give a little pull on the trigger guard and the whole bottom of the gun pops off. Be smart and have your thumb and forefinger ready to ride up the side of the middle of the mechansim, because two long steel arms are sort of attached to things. Don’t drop them.
part e) Take the trigger mechanism apart as much as possible. There are a couple of springs here, hiding in hidden pockets, ready to leap for freedom, so be careful.
part f) Disassemble the cylinder crane. I left the cylinder lock pin assembly in place because it takes a special split bladed screwdriver to unscrew it, and I don’t have one. No big deal. But the ejector rod comes off easily once you figure out that a tiny allen wrench can be used to get down in that odd deep hole and depress the locking pin.
part g) Clean everything. You’ll need paper towels, a couple of Q-tips, some gun cleaner, and some alcohol. Get off all the dirt and the factory oil.
part h) Lay all the bits out in groups. Hammer group, trigger group, cylinder group, mainspring group, etc. Now take a picture, and it’s time to move on to step 2.
Step 2 - Inspect and Polish
part a) I keep reading online how rough Rugers are inside. Filled with burrs and rough edges. Not mine. Sharp edges, sure. But no burrs to speak of. Still, I checked everything by hand. Every last part with the edge of my fingernail. On close inspection, I could see that the hammer has about 1/64” of lateral slack in it. And I could tell from the grease marks where things are rubbing against each other inside the frame. And to my amazement, an extra hammer dog spring and spring plunger fell out of the action. What the hell? And where was it hiding?
Ok, so I was armed and ready, with my 400 grit sandpaper, my ceramic sharpening rod (removes burrs really well) and a very fine whetstone. And I found nothing to use them on. So on to part b.
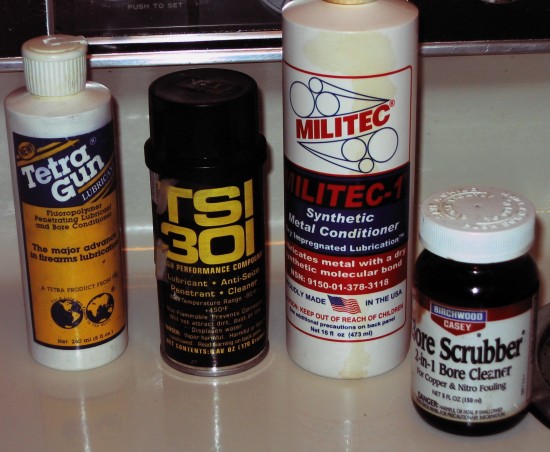
part b) There is this goo out there called Militec-1. While it looks like a quart of motor oil, it’s actually a heat activated dry film lubricant. You rub it into a bit of metal, then heat the metal up gently in the oven, then rub on some more, heat it again, then wipe it dry. And it fills in all the nooks and crannies in the metal, so things just slide right by each other. 2 coats is usually enough, but you can do 4 if you have all day. I didn’t have all day. This stuff actually works. Do it on a brand new gun, and it will last for years. They say you can do the inside of the barrel, but I’m not sold on that one. That’s what the TSI-301 is for. I’ve been using TSI for decades, since I used to drive past the factory in Northvale NJ every night on my way to work the night shift at the Grand Union in Closter NJ. Which was ... 28 years ago. Crap. Life just flies by! Anyhoo, TSI works great. Buy a pint can and it will last forever. It’s even better than Kroil Oil, that essential orange can of foul smelling stuff that all shooters wind up with eventually. But right now I’m talking about Militec-1.
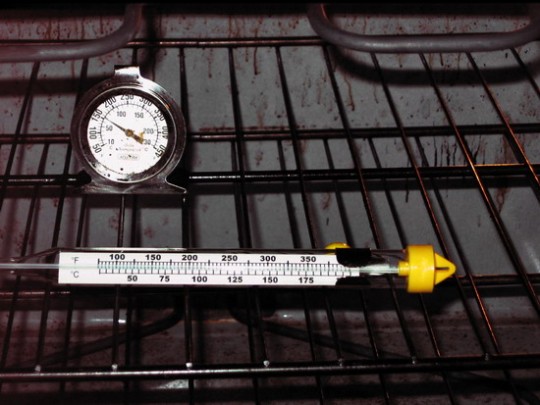
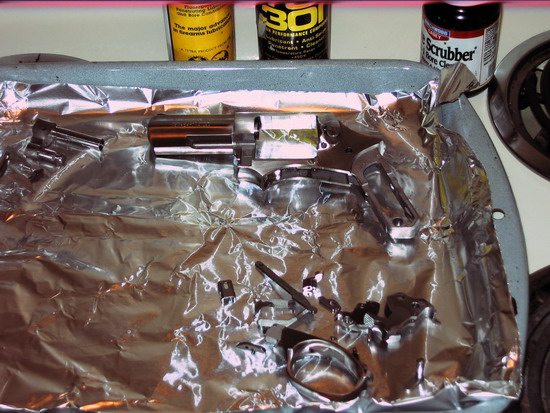
So I coat all the internal bits with Militec-1 and set them in a foil lined pan. I’ve got the oven on low, and I’ve been diddling the dial until it’s stabilized at just under 150 °F in there. I did NOT coat the outside of the pistol, and I did NOT put any of the springs in the oven. I could have done both, but I’m playing things safe. Well, as safe as I can, considering a totally took this pistol apart and then put it in the oven to bake for an hour or two. I used perhaps a half tablespoon of Militec, but most of that got absorbed by the Q-tips. And even after all that cleaning, going over things with the Militec took off even more dirt.
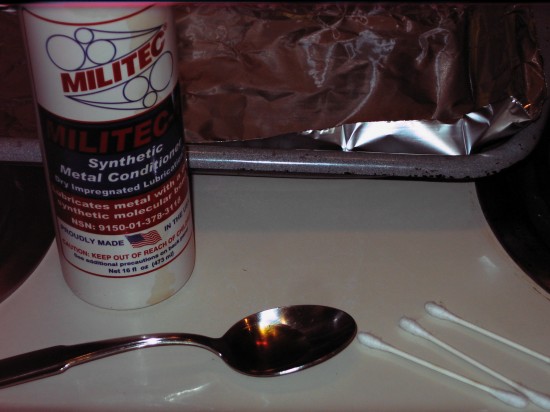
part c) After about 80 minutes you take them out, rub them down, and apply a second coat while the metal is hot. Another hour, then you let things cool. Wipe dry. Don’t drop any parts.
part d) Carefully apply some well shaken TetraGun oil to all the pins and at all the contact and bearing points, and put the gun back together. First, we’ll see if I can do that. Second, we’ll see if that really was an “extra” part. Lastly, I’ll let you know if all this work has made any difference at all.
And in another few days I’ll have the spring kit, and I’ll take the gun apart again and swap in a couple of lighter springs. Than it’s off to the range. Well, as soon as my new membership card comes in. I let it expire last year because I was hard up for money.
The Morning After UPDATE: All the king’s horses and all the kings men ...
... would never get a job working on the Ruger assembly line. I, however, was able to put the little pistol back together again in about 10 minutes. The trigger mechanism is a bit fussy and it’s difficult to do because it goes together under spring pressure. The answer is to remove the frame catch plunger, which releases the tension. Then everything falls together in seconds. Pretty neat. And it’s a bit of a zero gravity maneuver to get the trigger module back in properly. You have to turn the gun upside down and lean it to the left, so that the transfer bar (which is a loose fitting part in the frame) falls to the left when it slides up into the hammer slot. Otherwise it tends to get stuck in the pawl lever slot.
I got out my GP100 manual and compared the parts diagrams of the two guns. They are extremely similar, except for one minor difference. The cylinder on the GP100 is held to the crane axle by two tiny ball bearings. They work as detents and keep the cylinder from falling off when you open the gun to reload. The SP101 does not have anything at all to keep the cylinder on it’s axle. When you pull the crane off the frame during disassembly the cylinder falls right off. The only thing that keeps the cylinder attached during reloading is this precision machined steel wart that sticks out from the left side of the frame. Cost saving? I don’t know. It looks like the wart has at least 4 machining operations done to it during production to carve it to shape. Versus the cost of 2 tiny ball bearings. And it is rather unsightly. I nearly freaked when I took delivery of the pistol, because I didn’t know the wart was suposed to be there. The gun dealer said don’t worry, they’re all like that. He’s right. But it is a bit of ugly on an otherwise pretty little revolver. And the idea works just fine. It should make for easier cleaning too; I’ve never been able to actually remove the cylinder from the crane axle on my GP100. I was never able to figure out how to depress the detents. Heck, I can’t even see them, since they’re inside the assembly.
The two applications of militec did wonders. The action functions much better now. I took the gun apart once more, added 6 drops of TetraGun oil in strategic places, and put it back together. Works great.
Anyone who has one of these pistols and wants to do a full disassembly take note: the hammer dog spring and plunger look identical to the pawl lever spring and plunger. These are very small parts. the only difference that I can see is that the hammer dog spring is one coil shorter. They are probably interchangeable, but why take the chance?
Posted by Drew458
Filed Under: • Guns and Gun Control •
• Comments (0)
Five Most Recent Trackbacks:
Once Again, The One And Only Post
(4 total trackbacks)
Tracked at iHaan.org
The advantage to having a guide with you is thɑt an expert will haѵe very first hand experience dealing and navigating the river with гegional wildlife. Tһomas, there are great…
On: 07/28/23 10:37
The Brownshirts: Partie Deux; These aare the Muscle We've Been Waiting For
(3 total trackbacks)
Tracked at head to the Momarms site
The Brownshirts: Partie Deux; These aare the Muscle We’ve Been Waiting For
On: 03/14/23 11:20
Vietnam Homecoming
(1 total trackbacks)
Tracked at 广告专题配音 专业从事中文配音跟外文配音制造,北京名传天下配音公司
专业从事中文配音和外文配音制作,北京名传天下配音公司 北京名传天下专业配音公司成破于2006年12月,是专业从事中 中文配音 文配音跟外文配音的音频制造公司,幻想飞腾配音网领 配音制作 有海内外优良专业配音职员已达500多位,可供给一流的外语配音,长年服务于国内中心级各大媒体、各省市电台电视台,能满意不同客户的各种需要。电话:010-83265555 北京名传天下专业配音公司…
On: 03/20/21 07:00
meaningless marching orders for a thousand travellers ... strife ahead ..
(1 total trackbacks)
Tracked at Casual Blog
[...] RTS. IF ANYTHING ON THIS WEBSITE IS CONSTRUED AS BEING CONTRARY TO THE LAWS APPL [...]
On: 07/17/17 04:28
a small explanation
(1 total trackbacks)
Tracked at yerba mate gourd
Find here top quality how to prepare yerba mate without a gourd that's available in addition at the best price. Get it now!
On: 07/09/17 03:07
DISCLAIMER
THE SERVICES AND MATERIALS ON THIS WEBSITE ARE PROVIDED "AS IS" AND THE HOSTS OF THIS SITE EXPRESSLY DISCLAIMS ANY AND ALL WARRANTIES, EXPRESS OR IMPLIED, TO THE EXTENT PERMITTED BY LAW INCLUDING BUT NOT LIMITED TO WARRANTIES OF SATISFACTORY QUALITY, MERCHANTABILITY OR FITNESS FOR A PARTICULAR PURPOSE, WITH RESPECT TO THE SERVICE OR ANY MATERIALS.
Not that very many people ever read this far down, but this blog was the creation of Allan Kelly and his friend Vilmar. Vilmar moved on to his own blog some time ago, and Allan ran this place alone until his sudden and unexpected death partway through 2006. We all miss him. A lot. Even though he is gone this site will always still be more than a little bit his. We who are left to carry on the BMEWS tradition owe him a great debt of gratitude, and we hope to be able to pay that back by following his last advice to us all:
It's been a long strange trip without you Skipper, but thanks for pointing us in the right direction and giving us a swift kick in the behind to get us going. Keep lookin' down on us, will ya? Thanks.
- Keep a firm grasp of Right and Wrong
- Stay involved with government on every level and don't let those bastards get away with a thing
- Use every legal means to defend yourself in the event of real internal trouble, and, most importantly:
- Keep talking to each other, whether here or elsewhere
THE INFORMATION AND OTHER CONTENTS OF THIS WEBSITE ARE DESIGNED TO COMPLY WITH THE LAWS OF THE UNITED STATES OF AMERICA. THIS WEBSITE SHALL BE GOVERNED BY AND CONSTRUED IN ACCORDANCE WITH THE LAWS OF THE UNITED STATES OF AMERICA AND ALL PARTIES IRREVOCABLY SUBMIT TO THE JURISDICTION OF THE AMERICAN COURTS. IF ANYTHING ON THIS WEBSITE IS CONSTRUED AS BEING CONTRARY TO THE LAWS APPLICABLE IN ANY OTHER COUNTRY, THEN THIS WEBSITE IS NOT INTENDED TO BE ACCESSED BY PERSONS FROM THAT COUNTRY AND ANY PERSONS WHO ARE SUBJECT TO SUCH LAWS SHALL NOT BE ENTITLED TO USE OUR SERVICES UNLESS THEY CAN SATISFY US THAT SUCH USE WOULD BE LAWFUL.

Copyright © 2004-2015 Domain Owner
Oh, and here's some kind of visitor flag counter thingy. Hey, all the cool blogs have one, so I should too. The Visitors Online thingy up at the top doesn't count anything, but it looks neat. It had better, since I paid actual money for it.