Sarah Palin's image already appears on the newer nickels.
Aboard
HMS Galatea, flying the broad pennant of Commodore Alexander-Sinclair, the white steam of the
Fjord was sighted. The light cruiser, far on the wing of Beatty’s Battle Cruiser Fleet then turning away to the northward, stood on to investigate. At 2:18 she signaled to the fleet:
“Enemy in sight!” The rusty
N.J. Fjord had lifted the curtain on “the greatest drama of modern naval warfare.
Der Tag had come.”
It had been slow in coming. Taking advantage of her strategic position athwart the exits from the North Sea into the Atlantic, Great Britain had kept the German High Seas Fleet bottled up in the North Sea, and thus away from her vital Atlantic supply lines. And Britain would have to be defeated at sea if she was to be defeated at all.
The imprisonment of her High Seas Fleet had forced the Germans to result to U-boat warfare in attempting to interdict the Atlantic sea lanes, but since the
Lusitania sinking in 1915, the U-boats had been held on leash, for fear of provoking the United States into entering the war. President Woodrow Wilson had drawn the line. Meanwhile, the German High Seas Fleet struggled to pop the cork of its bottle, and cut the British Fleet down to a manageable size.
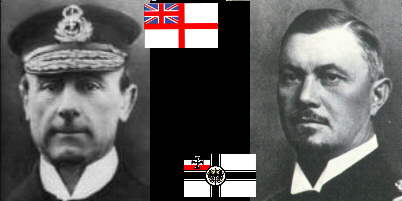
Both fleets were divided into “battle forces” (built around battleships, or dreadnoughts, as they were then known) and “scouting forces” (built around much faster battle-cruisers). Both wings of the High Seas Fleet were customarily stationed at Wilhelmshaven (the Jade Bay). In May 1916, most of the major British battle force (the Grand Fleet) was based at Scapa Flow in the Orkney Islands, north of Scotland, under Admiral Sir John Jellicoe. Other elements were based at Cromarty, on Moray Firth.
At Rosyth on the Firth of Forth, much nearer the German North Sea naval bases, Vice-Admiral Sir David Beatty was stationed with the battle-cruiser squadrons of the scouting force. At any stir of the High Seas Fleet, Beatty would be “first responder.” Beatty, an outspoken, rakish mastiff of a commander, itched for action, and was often impatient with his senior officer, the prudent and cautious Jellicoe. The Germans were well aware of Beatty’s hunger for a scrap. It was likely that he could be baited. Beatty’s squadrons became the logical choice for entrapment and destruction.
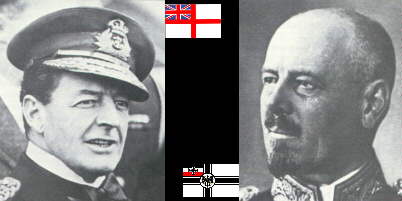
It had been tried before. German battle-cruisers under Beatty’s opposite number, Admiral Franz von Hipper, had bombarded towns on England’s east coast, hoping to draw their quarry into a trap. As Beatty’s opposite number, Hipper was well suited for his job. He had spent much of his career in destroyers, and probably always remained a “Tin Can Sailor” at heart. From this background, however, he brought dash and daring to his command of the German battle cruisers, and like Beatty, he chafed at being held on any kind of leash.
Thus the raids on the east coast of Britain. They did not succeed, however, in trapping Beatty’s forces.
One such raid culminated in the Battle of Dogger Bank, 24 Jan 1915, in which the British, due to misunderstood signals, applied themselves to overwhelming a lumbering old armored cruiser,
SMS Blücher, while the rest of Hipper’s force escaped.
In May 1916, Admiral Reinhard Scheer, recently risen to command of the High Seas Fleet, planned another entrapment raid, this time on the Sunderland. Unable, however, to carry out aerial (Zeppelin) reconnaissance of the British Fleet due to bad weather, Scheer abandoned this scheme. Instead, he substituted a sweep northward toward the Skagerrak, threatening British patrols and merchant shipping in that area. Scheer thus hoped to lure the British into waters infested by U-boats, which could help him cut off and annihilate portions of the British Fleet.
By the morning of 30 May, the British knew that something was up. Reports of increased U-boat activity and intercepted radio signals led them to suppose that Scheer was coming out of the Jade. By 10:30 p.m. on 30 May, the Grand Fleet was at sea, steaming to intercept. Beatty was steaming eastward from Rosyth,
and Jellicoe was hurrying down from Scapa Flow.
On the morning of 31 May, Scheer put to sea, sending Hipper’s battle-cruisers well ahead of his main body.
They would be the bait that would lure the British into a trap. Some U-boats had spotted some of Jellicoe’s ships, and one (U-32) had managed an unsuccessful attack, but the U-boat reports were sketchy, and were not enough to make Scheer believe that he had lured out the entire Grand Fleet. At worst, he supposed, he would have only Beatty to deal with.
On the other hand, Jellicoe had received faulty intelligence from the Admiralty. They reported to him that the German flagship (meaning Scheer) was still in port, and if Scheer was still in port, so was the German battle fleet, leaving only Hipper to be dealt with.
Thus, both fleets groped toward each other through the mists and choppy water of the North Sea, each unaware of the other’s presence, and each unaware that they were about to meet in the war’s only collision between the Grand Fleet and the High Seas Fleet. At stake was strategic control of the North Sea.
The fleets all but missed each other. On the afternoon on 31 May, Beatty’s forces were on a course that would take them well behind Hipper’s force and well ahead of Scheer’s, causing him to miss both. But then HMS
Galatea sighted the tramp steamer,
N.J. Fjord,, stopped and blowing off steam, and investigated.....
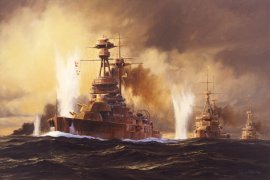
“The battle that ensued, fought entirely in the sullen, heaving cockpit of the North Sea, was naturally divided by circumstance and tactics into four principal phases. Beatty...and Hipper...had been sent ahead of the main fleets, each feeling for the enemy. The first phase of the battle ensued when Beatty and Hipper made contact and dueled with their battle-cruisers as Hipper led Beatty southward toward the bulk of the German High Seas Fleet, hidden in the mists.”
It was during this “Run to the South” that two British battle-cruisers (HMS
Indefatigable and HMS
Queen Mary paid the price for their indifferent armoring, blowing up under fire, leaving only a handful of survivors between them. Beatty’s flagship, HMS
Lion, came within an ace of joining them. Hits and a flash fire in one of her turrets nearly reached a magazine. Only the gallantry of the mortally-wounded turret commander and his men resulted in the magazine doors being shut, and the magazine being flooded, with hardly a second to spare. Some of the men who carried out the commander’s order were later found dead, with their hands still clutching the door clips.
”A German salvo struck the Princess Royal
; a signalman on the Lion
’s bridge, seeing the burst of impact and the licking flame, mistakenly reported: ‘Princess Royal
blown up, sir.’ Beatty turned his keen blue eyes and jutting jaw toward his flag captain: “Chatfield, there seems to be something wrong with our bloody ships today. Turn two points to port’ (toward the enemy).”
Only HMS
New Zealand among Beatty’s battle cruisers escaped severe damage during the “Run to the South.” But now Scheer’s battle fleet had been sighted, steaming up from the south, and it was Beatty’s turn; having been lured into Scheer’s jaws, he would lure Scheer into Jellicoe’s.
“When the German main body was encountered, Beatty turned north and steamed toward his own main fleet, with the Germans coming hard after him and the great guns echoing over the waters. The third phase was the brief encounter of the main bodies, when Scheer with the High Seas Fleet steaming in column met the Grand Fleet ‘crossing them’ or steaming at a right angle across Scheer’s course.”
During this action, a third British battle-cruiser, HMS
Invincible, went the way of her two recently departed sisters, under the guns of SMS
Derfflinger.. Among the dead was Rear Admiral Sir Horace Hood. Another British rear admiral, Sir Robert Arbuthnot, went down with armored cruiser HMS
Defence.. One of the newest British dreadnoughts, HMS
Warspite, suffered steering gear breakdown and grievous damage from 13 heavy-caliber shell hits. HMS
Marlborough took a torpedo, and like HMS
Warspite, had to be ordered home. On the other hand, Hipper’s flagship, SMS
Lützow, was pounded into a sinking wreck and was ordered home; on the way, she had to be abandoned and left to sink. Hipper transferred his flag to battle-cruiser SMS
Moltke, least damaged of his heavy ships.
Scheer twice extricated his fleet from the skilful maneuvers of Jellicoe, although he suffered heavy damage to many of his vessels while inflicting minimal damage in return. To cover his second escape, he ordered Hipper’s scouting forces to charge head-on into the center of the enemy line. This suicidal charge became known as Hipper’s “death ride,” and the German battle-cruisers, already heavily pounded, took a dreadful beating. All of them managed to withdraw, however, as their supporting destroyers scampered past and launched torpedoes at the Grand Fleet, causing Jellicoe to turn away. In the aftermath, however, he positioned himself between Scheer and his bases, with night coming on.
”
The final phase, after the Germans turned away back toward port was a sprawling, inchoate night action, chiefly between the light forces.”
Many light forces were lost as Scheer crossed behind Jellicoe and steamed right through the fringe of the Grand Fleet, to reach home and “pop the champagne” on the morning of June 1. On paper at least, he had won a clear tactical victory. In addition to SMS
Lützow, he had lost one elderly pre-dreadnought battleship (SMS
Pommern), four light cruisers, and five destroyers and torpedo boats. The British losses were much heavier. In addition to the three battle cruisers blown up, they lost three armored cruisers (forerunners of the heavy cruisers of World War II), and eight destroyers and torpedo boats.
Over 6000 British seamen lost their lives, compared to some 2551 German losses. Germany was overjoyed, and the legend of the “victory of the Skagerrak” was born (and persists to this day).
But for Germany, Jutland was a strategic defeat. An American newspaper noted, “The German Fleet has assaulted its jailer, but it is still in jail.” This was a crisp summary of the facts. British strategic control of the North Sea had been maintained in the face of the most serious German assault of the war.
Scheer knew it, too, and went on to admit to his superiors that success in future fleet actions was highly unlikely. The High Seas Fleet, still in its bottle, would have to remain there. Further sorties of the High Seas Fleet did no more than prove that Scheer’s assessment was correct.
The men in the fleet realized this as well. Disillusionment and disaffection set in, reinforced by memories of a misty horizon studded with the orange flashes of enemy guns, and the fighting spirit of the men was increasingly tainted as the war dragged on and the fleet swung round its anchors month in, month out.
But Britain had to be defeated at sea if she was to be defeated at all. German High Command attention was turned toward their last remaining card to play at sea, renewal of unrestricted U-boat warfare.
In early 1917, it was renewed, and by the end of April, the United States was in the war.....
ACKNOWLEDGMENTS: Quotations taken from Hanson W. Baldwin,
“Sea Fights and Shipwrecks, (New York: Doubleday, 1955).
Further information about the Battle of Jutland may be found at:
www.firstworldwar.com
www.royal-navy.mod.uk
www.worldwar1.co.uk
GET ME OUT OF HERE ...
Oh, and here's some kind of visitor flag counter thingy. Hey, all the cool blogs have one, so I should too. The Visitors Online thingy up at the top doesn't count anything, but it looks neat. It had better, since I paid actual money for it.

 Tuesday - May 31, 2005